AVR chip programming how-to
Before you can use the micro, it must be programmed correctly
You need a programmer and the relative software
Don't worry: if “programmer” sounds expensive, it's easy to build a very simple interface for the parallel port of your PC.
You can find a very simply schematic diagram here: “Ken's dongle”. This version doesn't need an external power supply and works with the SP12 program (see next paragraph).
There are two free programs you can use: SP12 or PonyProg
The first program could be a little hard to use, but I have written a script for you to automate the programming process. The second has a graphical interface that could help the beginners. Please continue to read this chapter before to start programming.
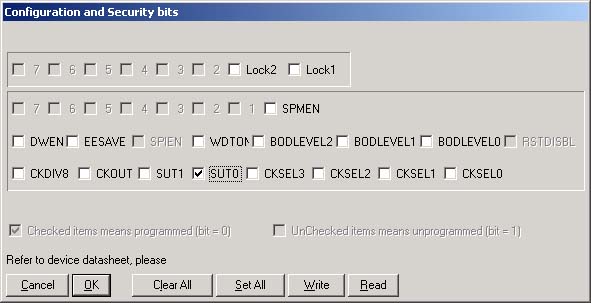
A very important thing to know about these chips, is that when you buy a new one it is programmed to use the internal clock oscillator. To use the external crystal oscillator, you must change some chip options (also known as “fuses”). In this case the “Clock sources options” bits CKSEL3..0 needs to be programmed to “1111” (note: 1 means “unprogrammed”. Please read Atmel documentation for more info).
In the next sections I'll explain how to program these options with both software.
SP12
SP12 home page : Click here
This is a command line programmer available for Dos, Windows (not Millennium Edition) and Linux. It is not for novice, but it's a powerful program.
After the installation (don't forget to install “giveio.sys” if you are using Win2000/XP) you need to run “SP12 -i” then, if you have built my interface, you need to edit the “_sp12rc” and change the line “KANDA=0” to “KANDA=1”.
If you want you can build a very simple interface using “Ken's dongle” schematic. In this case don't change the “KANDA” line.
Now you can copy the “ml3.v2.0.0-8mhz.hex” and “program-with-sp12.bat” files in the SP12 directory and then launch the batch file.
You’re done!
PONYPROG
PONYPROG home page : Click here
A nice program that allows to you to program the chip with a few clicks.
Install the software, select the appropriate parallel port, the interface type and the correct chip version (don't use “AVR Auto”, the current software version doesn't work correctly with the Tiny2313).

Open the ml3.hex file with “File / Open program (FLASH) file”, then program the chip with “Command / Write Program (FLASH)”.
To program the clock options, use “Command / Security and configuration bits” then select the options as in figure:>
That's all!
